Development Workflow
The end-to-end developer workflow is the bread and butter of the Next.js developer experience. You start with a Jira ticket ID and then work your way to having your code changes merged into the main branch.
This is the developer workflow, but the full end-to-end workflow, from developer to production, is outlined in this architecture diagram.
Assumptions
This documentation page makes some assumptions:
- You're starting with a fresh Next.js Docker container
- Your Jira ticket ID is
CMS-99999 - You are starting out on the
mainbranch in Git - You will checkout a branch named
feature/CMS-99999-your-branch-name-will-look-like-this.
It Starts With A Jira Ticket ID
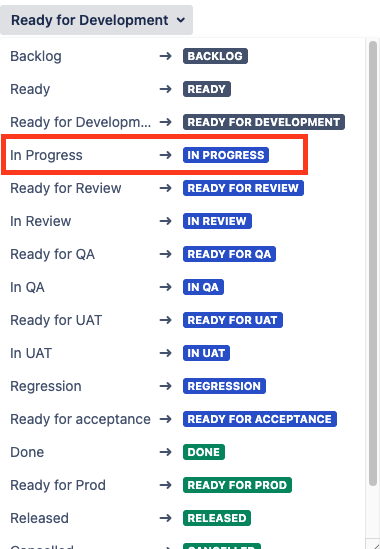
The Developer Workflow starts with a Jira ticket ID that is of the form CMS-nnnnn (example: CMS-99999). You need an ID in order to log your hours worked and also to identify the git branch as well as the Jira ticket details. You can see your ticket at https://jira.schwab.com/browse/CMS-nnnnn
 A typical ticket in Jira that is ready for development work
Once you're ready to start work on your ticket, you should change the status to In Progress:
Starting A New Coding And Testing Cycle
We use the VS Code IDE for development.
Creating Your Container And Attaching to VS Code
You'll want to follow the steps in Managing Docker Containers to ensure that you've created a container and attached it to a window in VS Code.
Preparing The Code
Taking a few steps early on to prepare your container can make things simpler later on.
Use git status to ensure that you are on the main branch in git:
cd /home/nextjs-web
git status
# Output should show:
# On branch main
# Your branch is up to date with 'origin/main'.
# nothing to commit, working tree clean
It's always a good idea to clean out any build artifacts that may be lying around:
cd /home/nextjs-web
pnpm clean
pnpm clean-next
pnpm clean- removes allnode_modulesdirectories throughout the repopnpm clean-next- removes all.nextdirectories which are Next.js build artifacts
Use git pull to get the latest code from the main branch. Then install and build all the apps in the container with pnpm install and pnpm build:
cd /home/nextjs-web
git pull
pnpm install
pnpm build
Checking Out Your Git Branch
The first step is to do a schwab checkout using your Jira ticket ID to create your branch in git.
schwab checkout will:
- Prompt you to create a new branch. That branch will be created in git and you will be switched to it in your container.
- If any feature flags labels are added and not already created, it will prompt you to select the flag name for flag creation. If selected, a feature flag file will be created in the repo.
cd /home/nextjs-web
schwab checkout CMS-99999
# (Use arrow keys)
# ❯ Create a new branch: feature/CMS-99999-your-branch-name-will-look-like-this from main
# feature/CMS-99999-your-branch-name-will-look-like-this checked out.
# Create a feature flag
Branch names are typically prefixed with either of type feature or bugfix depending on the type field of the associated Jira ticket. You will want to make a note of your branch name, feature/CMS-99999-your-branch-name-will-look-like-this, as you will use it in future steps. The string your-branch-name-will-look-like-this is taken from the title of your Jira ticket.
Verify that you are on your branch by using git status:
cd /home/nextjs-web
git status
# Output should show:
# On branch feature/CMS-99999-your-branch-name-will-look-like-this
# nothing to commit, working tree clean
Start Coding
Now you're ready to start coding. You may be working on a specific app -- the apps are in /home/nextjs-web/apps. Or, you might be working on various packages, such as UI components or API calls, in the /home/nextjs-web/packages directory.
Testing Your Code
Pull requests (PRs) have to be re-submitted if they fail backend tests, so testing your code before you commit or create a pull request is always a good idea.
The following CLI commands, which you can run in your terminal window, will help you test out your code to make sure it will pass backend tests. If they pass locally, then they should also pass when the backend runs the tests.
Running Lint, Type-Check, and Conformance
Run lint, conformance, and type-check to make sure your code is well-formed. The errors (if any) should be self-explanatory: We use biome for linting.
cd /home/nextjs-web
pnpm lint
For non-Schwab apps such as apps/storybook, apps/docs, apps/beacon-docs, and apps/sanity-next, there may be biome errors that you can't (or won't) fix. You can have biome ignore those errors.
Have biome ignore the next line for the useNamingConvention rule:
 // biome-ignore lint/style/useNamingConvention: Docusaurus API requirement
    experimental_faster: {
Have biome ignore all code between biome-ignore-start and biome-ignore-end for the useNamingConvention rule:
// biome-ignore-start lint/style/useNamingConvention: Docusaurus API requirement
   experimental_faster: {
     swcJsMinifier: true,
     swcCssMinifier: true,
     lightningCssMinifier: false,
   },
// biome-ignore-end
cd /home/nextjs-web
pnpm conformance
For non-Schwab apps such as apps/storybook, apps/docs, apps/beacon-docs, and apps/sanity-next, you can fix conformance errors by running conformance with the --allowlist-errors flag:
 cd /home/nextjs-web
 pnpm conformance --allowlist-errors
Don't forget to commit the allowlist to git.
cd /home/nextjs-web
pnpm type-check
Running Jest Tests
You will want to make sure the unit tests all pass:
cd /home/nextjs-web
pnpm test
Running all the tests can be time consuming. If you just want to run tests on changed files only:
cd /home/nextjs-web
pnpm test:fast
Or, if you're just interested in running one test, you can run it directly:
cd /home/nextjs-web
pnpm test heading-link.test.tsx
Once you're ready to start work on your ticket, you should change the status to In Progress:
cd /home/nextjs-web/apps/www.schwab.com
pnpm test:watch
If you have modified UI components and snapshot tests are failing, you can fix the snapshots with this command:
cd /home/nextjs-web
pnpm test -- -u
We use the VS Code IDE for development.
Committing Your Code
After completing your development work and ensuring all tests pass locally, you'll want to commit your code. Using schwab commit handles some extra steps for you
cd /home/nextjs-web
schwab commit
schwab commit will, behind the scenes, get your Jira ticket details and some other data. It will also prompt you for some data:
- You need to select which app you're working on
- You select the level of code change (major, minor, or patch)
- You provide a commit message
Creating A PR (Pull Request) Or Just Pushing Code
The first time you run schwab push, it will ask you if you want to create a PR.
- If you answer no, it will just push your code to Github and create a Vercel deployment (your Vercel deployment link will appear at the end of the
schwab pushcommand output). This is a good way to save your changes and to view the results of your code on a live site without actually creating a PR. - If you answer yes and create a PR, the backend will attempt to create a PR and a Vercel deployment.
cd /home/nextjs-web
schwab push
On push, the backend identifies if any new feature flags are added. If found, the flag is created in LaunchDarkly along with a comment about flag creation status in your Jira ticket
Managing Your PR (Pull Request)
Once you've created your PR (Pull Request), you'll see it in the list of open pull requests here: https://github.com/charlesschwab/nextjs-web/pulls
Click on your pull request to expose all the details and see if it has passed all backend checks. By default, it will be tagged as DO NOT MERGE.

Pull request showing initial "DO NOT MERGE" status with pending checks
PRs typically take 10-20 minutes to run through all the backend tests.
Monitoring Your PR Status
Scroll down to the bottom of your PR to visually watch your PR run through all the tests. If all the tests succeed, you'll see a green status indicator.

Example of a pull request with all tests passing (green checkmarks)
Even though the heading may say "Some checks haven't completed yet", all of the relevant tests have been completed. Other steps related to release tags, Veracode static scans, or other tasks will be handled later.
You can see a more detailed progress of the backend tests by clicking on the three dots:

Click on the three dots and select View details to see a detailed view of the progress
If some steps failed, there will be a red indicator next to the failing steps. You can click on the failing steps to see the error messages. You will need to fix those errors and resubmit your PR.
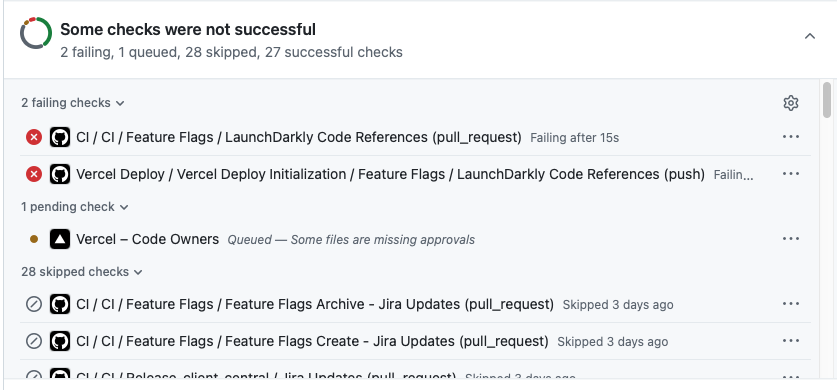 Example of a pull request with failing tests (red X indicators)
Updating Your Pull Request Branch With Main
If you've spent a lot of time on your ticket, the passage of time may make your branch fall behind the main branch.
If your branch is behind main, near the bottom of your pull request, you'll see a notification "This branch is out-of-date with the base branch." You'll need to click on the Update branch button in order to bring your branch up-to-date with main and get your pull request accepted. This will cause all the backend checks to run again.
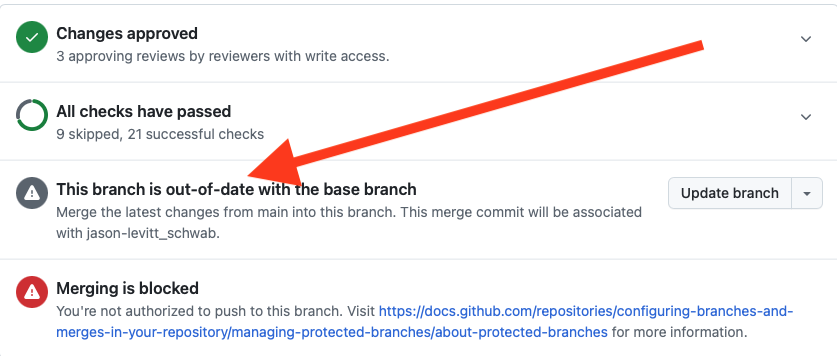 Example showing "This branch is out-of-date" message with Update branch button
Making Your PR Ready for Review
If all the tests pass, you'll want to run schwab ready to signal that it's ready for review:
schwab ready
This should change the status of your Jira ticket to Ready For Review.
Your PR must be reviewed by one of the Trusted Committers before it moves to the next step.
You will typically post to a Microsoft Teams forum such as Front-End Trailblazers and ask people to review your PR.
The Trusted Committers may raise questions that need to be resolved before your PR can move forward.
Resolving Issues With Your Pull Request
The Trusted Committers may raise issues with your pull request that need to be resolved before it can move forward. You should receive an email indicating that you have issues about your PR that need to be resolved.
Requested Changes:
- These are issues that must be addressed before the PR can be merged into main
- You may need to make code changes and re-push your PR in order to fix the issues
 Example of requested changes that must be addressed before merging
General Comments:
- These may be suggestions or questions that don't necessarily require code changes
- You may need to respond with clarifications, or, you may need to fix the issues and push your PR again
 Example of general comments and discussion on a pull request
Resolving Conversations
You'll need to resolve any issues that the Trusted Committers have raised. After answering questions and, possibly, fixing your code, you'll see a Resolve Conversation button for each issue that you resolved. You must click on this button to indicate that you've resolved an issue.
 Example of the "Resolve Conversation" button that appears after addressing feedback
Review by QA (Quality Assurance)
Once your code has passed all verification steps and has been reviewed by at least two Trusted Committers, it will be reviewed by the QA team. They may flag issues or pose questions about your changes that could require code changes and thus you may have to re-push those changes.
Merging To Main
The final step in the lifecycle of your ticket is when your code changes are merged into the main branch on git.
You should change the status of your Jira ticket to In Review.
To reach this point:
- Your code has passed all verficiation steps
- Your code has been reviewed and accepted by at least two Trusted Committers
- Your code has been reviewed by QA
Congratulations!