Feature Flags Developer Guide
A practical guide for developers working with feature flags in the Next.js monorepo.
Overview
Feature flags enable controlled feature rollouts, A/B testing, and runtime configuration without deploying new code. Our system integrates the Vercel Flags SDK with LaunchDarkly for powerful, flexible feature management.
Key Benefits:
- Gradual Rollouts: Deploy features to specific user segments
- A/B Testing: Test different implementations simultaneously
- Emergency Toggles: Disable problematic features instantly
- Parallel Development: Multiple teams work independently
Key Resources:
Quick Start Checklist
Before implementing a feature flag:
- Jira ticket created with proper labels (
_FFprefix and_appprefix) - Feature flag naming, taken from a Jira ticket label, follows conventions
- Determine if flag is static (build-time) or dynamic (runtime)
Understanding Feature Flag Types
Static vs Dynamic Flags
Choose the right type for your use case:
| Type | Use Case | Evaluation | Example |
|---|---|---|---|
| Static | Pages generated at build time or ISR | Build-time via evaluateStaticFlag() | Content pages, marketing pages, stories |
| Dynamic | Runtime features and API endpoints | Runtime via evaluateDynamicFlag() | Search results, API responses, webhooks |
- Static: Most visible UI changes on pages that use Static Site Generation (SSG) or Incremental Static Regeneration (ISR)
- Dynamic: Features that must respond to runtime conditions like search queries, user actions, or API calls
Some changes (e.g., next.config.js, build configuration) don't support feature flags. In these cases, implement your fix directly without flag wrapping.
Flag Creation Process
Prerequisites
Required Information:
- Jira Ticket ID: e.g.,
CMS-69342from a Jira ticket URL, for example:https://jira.schwab.com/browse/CMS-69342 - Jira Labels (added by team lead or automated process):
- Feature Flag name: Starts with
FF_(e.g.,FF_Fix_Something_PUB) - Application name: Starts with
app_(e.g.,app_www.schwab.com)
- Feature Flag name: Starts with
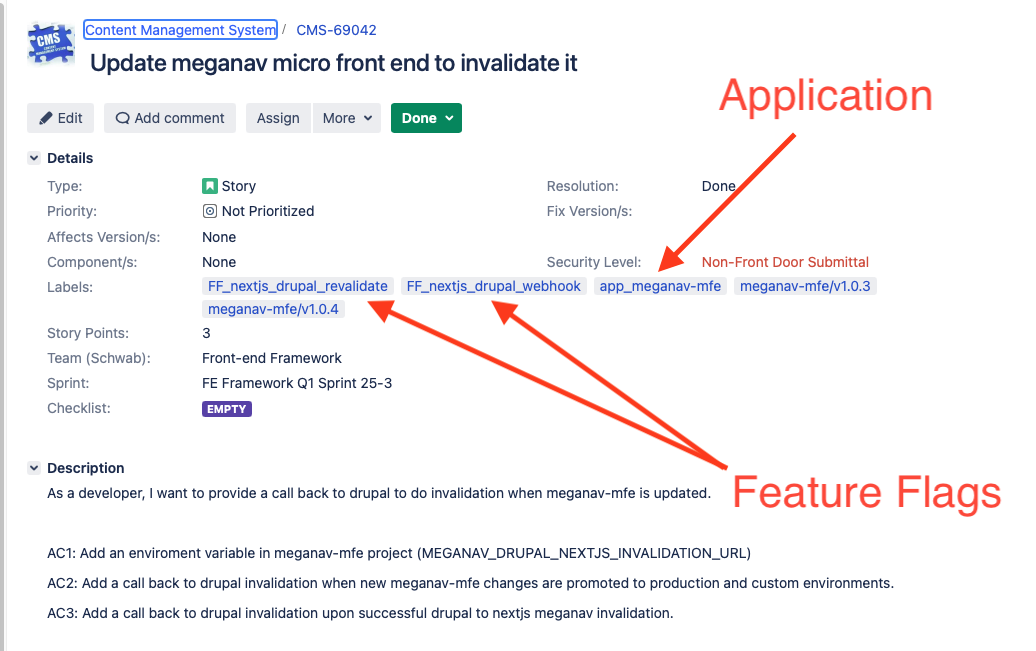
Feature flags follow a naming pattern: FF_<Feature>_<Audience>
Examples:
FF_Fix_Something_PUB→ becomesfixSomethingPubin codeFF_Release_Edu_Search→ becomesreleaseEduSearchin code
The formatFeatureFlagName function automatically converts labels to camelCase.
Creating Feature Flags
Two CLI commands create feature flags automatically:
Option 1: schwab checkout (Recommended)
Use this when starting fresh work on a Jira ticket.
schwab checkout CMS-69342
What it does:
- Checks if you're already on a branch for this ticket
- Prompts to create/checkout an appropriate branch
- Detects feature flags from Jira labels
- Offers to create feature flag files automatically
- Internally calls
schwab pullflagsif needed
Interactive Prompts:
- Select branch from list (use arrow keys + spacebar)
- Confirm feature flag creation (if flags detected in Jira labels)
Option 2: schwab pullflags
Use this when:
- You've already created a feature branch
- New flags were added to your Jira ticket
- You need to reset/recreate a flag file
schwab pullflags CMS-69342
What it does:
- Scans Jira ticket for
_FFlabels - Creates missing flag files in the appropriate app directory
- Updates existing flags if needed
Generated Flag File Structure
After running either command, your flag file will be created:
Location: /home/nextjs-web/apps/<app-name>/src/flags/flags/<flagName>.ts
Example: For FF_Fix_Something_PUB in www.schwab.com:
import { declareFlag } from '@schwab/utilities/flags';

export const fixSomethingPub = declareFlag({
  key: 'fixSomethingPub',
  defaultValue: false,
  description: 'Fix: EDU SomethingToFix PUB',
});

export default fixSomethingPub;
Always leave defaultValue: false when committing. This ensures the flag is off by default in all environments.
Verification
Verify your flag was created successfully:
# List all flags in your app
ls /home/nextjs-web/apps/www.schwab.com/src/flags/flags/

# Check flag content
cat /home/nextjs-web/apps/www.schwab.com/src/flags/flags/fixSomethingPub.ts
Implementing Feature Flags
Finding Your Feature Flag
From Jira Labels:
- Flag label:
_FF_Fix_Something_PUB→ variable name:fixSomethingPub - App label:
_app_www.schwab.com→ location:/home/nextjs-web/apps/www.schwab.com/src/flags/flags/
File location pattern:
/home/nextjs-web/apps/<app-name>/src/flags/flags/<flagNameInCamelCase>.ts
Variable Naming Convention
Pattern: Prefix flag name with flag when using in code
| Flag File Name | Variable Name in Code |
|---|---|
fixSomethingPub.ts | flagFixSomethingPub |
releaseEduSearch.ts | flagReleaseEduSearch |
featureCheckBotIdModes.ts | flagFeatureCheckBotIdModes |
Implementation Pattern Overview
Feature flags create conditional code paths:
// Pseudo-code pattern
if (flagFeatureName === true) {
  // New feature code
} else {
  // Existing code (kept for rollback)
}
Unlike typical development, both old and new code remain in the codebase. The old code provides a rollback path if issues arise.
Static Feature Flags (Build-Time)
When to Use
Use static flags for:
- Pages generated at build time (SSG)
- Incremental Static Regeneration (ISR) pages
- Most visible UI components
- Content pages, stories, marketing pages
Basic Implementation
Step 1: Import Required Functions
import { evaluateStaticFlag } from '@schwab/utilities/flags';
import { allFlags } from '../../../flags'; // Adjust path as needed
Step 2: Evaluate Flags in Component
export default async function Page({ params }: { params: Promise<Params> }): Promise<JSX.Element> {
  const { code } = await params;

  const [flagFixSomethingPub] = await Promise.all([
    evaluateStaticFlag(allFlags, code, 'fixSomethingPub'),
  ]);

  // Use the flag...
}
Step 3: Multiple Flags (Common Pattern)
const [
  flagTealiumTracking,
  flagEduSearch,
  flagFixSomethingPub,
] = await Promise.all([
  evaluateStaticFlag(allFlags, code, 'tealiumTrackanalyticsFunction'),
  evaluateStaticFlag<boolean>(allFlags, code, 'releaseEduSearch'),
  evaluateStaticFlag(allFlags, code, 'fixSomethingPub'),
]);
Use TypeScript generics for non-boolean flags:
evaluateStaticFlag<string>(allFlags, code, 'featureCheckBotIdModes')
Getting code and flags Parameters
Scenario A: Parameters Already Available
Some components already receive flags and code as props:
Content Type Components:
/packages/ui/src/content-types/PatternLandingPage/pattern-landing-page.tsx/packages/ui/src/content-types/Story/story.tsx/packages/ui/src/content-types/Collection/collection.tsx/packages/ui/src/content-types/Topic/topic.tsx/packages/ui/src/content-types/Person/person.tsx
export default async function SomeContentType({
  flags,  // Already available
  code,   // Already available
  // ... other props
}: TComponentProps): Promise<JSX.Element> {
  const [flagFixSomethingPub] = await Promise.all([
    evaluateStaticFlag(flags, code, 'fixSomethingPub'),
  ]);
}
Scenario B: Top-Level Page Component
For Next.js page components, extract code from params:
type Params = {
  code: string;
  alias: string[];
};

export default async function Page({ params }: { params: Promise<Params> }): Promise<JSX.Element> {
  const { code } = await params;

  const [flagFixSomethingPub] = await Promise.all([
    evaluateStaticFlag(allFlags, code, 'fixSomethingPub'),
  ]);
}
Real-World Example: Conditional Rendering
export default async function StoryPage({ params }: { params: Promise<Params> }): Promise<JSX.Element> {
  const { code } = await params;

  const [flagNewStoryHeader] = await Promise.all([
    evaluateStaticFlag(allFlags, code, 'experimentEduNewStoryHeader'),
  ]);

  return (
    <Layout>
      {flagNewStoryHeader ? (
        <NewStoryHeader {...headerProps} />
      ) : (
        <LegacyStoryHeader {...headerProps} />
      )}
      <StoryContent {...contentProps} />
    </Layout>
  );
}
Real-World Example: Feature Modification
export default async function BranchLocator({ params }: { params: Promise<Params> }): Promise<JSX.Element> {
  const { code } = await params;

  const [flagGeocodingSuggestions] = await Promise.all([
    evaluateStaticFlag(allFlags, code, 'releaseBranchGeocodingSuggestions'),
  ]);

  const searchConfig = {
    ...baseConfig,
    enableSuggestions: flagGeocodingSuggestions,
    maxResults: flagGeocodingSuggestions ? 10 : 5,
  };

  return <BranchSearch config={searchConfig} />;
}
Dynamic Feature Flags (Runtime)
When to Use
Use dynamic flags for:
- API routes and endpoints
- Server actions
- Search and filter operations
- Runtime-evaluated features
- Webhook handlers
Basic Implementation
Step 1: Import Required Functions
import { evaluateDynamicFlag } from '@schwab/utilities/flags';
import { allFlags } from '../../../../flags'; // Adjust path as needed
Step 2: Evaluate Flags at Runtime
export async function GET(request: Request) {
  const [flagApiOptimization] = await Promise.all([
    evaluateDynamicFlag(allFlags, 'featureApiOptimization'),
  ]);

  if (flagApiOptimization) {
    return optimizedApiHandler(request);
  }
  return legacyApiHandler(request);
}
Real-World Example: API Route
export async function getMfeFeatureFlags(): Promise<Record<string, boolean>> {
  const [
    nextjsDrupalRevalidate,
    featureMeganavFooter,
    meganavMfeDisableSearchUi,
  ] = await Promise.all([
    evaluateDynamicFlag(allFlags, 'nextjsDrupalRevalidate'),
    evaluateDynamicFlag(allFlags, 'featureMeganavFooter'),
    evaluateDynamicFlag(allFlags, 'meganavMfeDisableSearchUi'),
  ]);

  return {
    nextjsDrupalRevalidate,
    featureMeganavFooter,
    meganavMfeDisableSearchUi,
  };
}
Real-World Example: Dynamic URL Construction
export async function revalidateContent() {
  const [flagNewApiDomain] = await Promise.all([
    evaluateDynamicFlag(allFlags, 'featureNewApiDomain'),
  ]);

  const hostDomain = process.env.NEXT_API_PROD_DOMAIN;
  const apiDomain = flagNewApiDomain
    ? hostDomain.replace('api', 'api-new')
    : hostDomain;

  const apiUrl = `https://${apiDomain}/api/revalidate`;

  return fetch(apiUrl, { method: 'POST' });
}
Passing Flags to Child Components
The Challenge
Feature flags must be evaluated at the top level (Page component) to work with Vercel Toolbar and LaunchDarkly. When your changes are in a child component, you need to pass flags down the component tree.
Anti-Pattern: Individual Flag Props
❌ Don't do this (doesn't scale):
interface IChildProps {
  existingVar1: number;
  existingVar2: string;
  flagFixSomething: boolean;
  flagNewFeature: boolean;
  // Adding more flags requires interface changes
}
Recommended Pattern: Feature Flag Record
✅ Do this (scalable):
import { TFeatureFlag } from '@schwab/schema/global/FeatureFlag';

interface IChildProps {
  existingVar1: number;
  existingVar2: string;
  featureFlags?: TFeatureFlag;  // Extensible
}

export function ChildComponent({
  existingVar1,
  existingVar2,
  featureFlags,
}: IChildProps): JSX.Element {
  // Access flags
  const isNewFeatureEnabled = featureFlags?.flagNewFeature;

  return (
    // Component JSX
  );
}
Complete Example
import { TFeatureFlag } from '@schwab/schema/global/FeatureFlag';
import { evaluateStaticFlag } from '@schwab/utilities/flags';
import { allFlags } from '../../../flags';

export default async function ParentPage({ params }: { params: Promise<Params> }): Promise<JSX.Element> {
  const { code } = await params;

  const [
    flagFixSomething,
    flagNewFeature,
    flagExperiment,
  ] = await Promise.all([
    evaluateStaticFlag(allFlags, code, 'fixSomethingPub'),
    evaluateStaticFlag(allFlags, code, 'releaseNewFeature'),
    evaluateStaticFlag(allFlags, code, 'experimentAbTest'),
  ]);

  // Create flag record
  const flaglist: TFeatureFlag = {
    flagFixSomething,
    flagNewFeature,
    flagExperiment,
  };

  return (
    <ChildComponent
      existingVar1={42}
      existingVar2="data"
      featureFlags={flaglist}
    />
  );
}
import { TFeatureFlag } from '@schwab/schema/global/FeatureFlag';

interface IChildProps {
  existingVar1: number;
  existingVar2: string;
  featureFlags?: TFeatureFlag;
}

export function ChildComponent({
  existingVar1,
  existingVar2,
  featureFlags,
}: IChildProps): JSX.Element {
  return (
    <div>
      {featureFlags?.flagNewFeature ? (
        <NewImplementation />
      ) : (
        <LegacyImplementation />
      )}
    </div>
  );
}
Viewing Features
Once you've implemented feature flags in your code, you'll want to toggle them on and off to see the results. There are four methods to control feature flags during development and testing.
Method 1: Manual Flag Override (Quick Testing)
The fastest way to test your feature flag locally.
Option A: Modify in Code (Temporary)
Directly override the flag value after evaluation:
const [tealiumTrackanalyticsFunction, flagFixSomethingPub] = await Promise.all([
  evaluateStaticFlag(flags, code, 'tealiumTrackanalyticsFunction'),
  evaluateStaticFlag(flags, code, 'fixSomethingPub'),
]);
flagFixSomethingPub = true; // Override for testing
Remove this override before committing your code!
Option B: Change Default Value (Cleaner)
Modify the flag definition file directly:
Location: /home/nextjs-web/apps/www.schwab.com/src/flags/flags/fixSomethingPub.ts
export const fixSomethingPub = declareFlag({
  key: 'fixSomethingPub',
  defaultValue: true,  // Changed from false for testing
  description: 'Fix: EDU SomethingToFix PUB',
});
The development server will automatically detect the change and update.
ALWAYS change the value back to false before committing your code.
Method 2: Vercel Toolbar Component (Development Mode)
The Vercel Toolbar provides a visual interface to toggle flags in real-time.
Availability
Currently available in:
www.schwab.com
The toolbar is automatically loaded in development mode via the layout file:
Location: /home/nextjs-web/apps/www.schwab.com/src/app/[code]/layout.tsx
import { VercelToolbar } from '@vercel/toolbar/next';
...
const shouldInjectToolbar = process.env.NODE_ENV === 'development';
...
{shouldInjectToolbar && <VercelToolbar />}
Usage Steps
- Start Development Server
cd /home/nextjs-web/apps/www.schwab.com
pnpm dev
- Open App in Browser
Navigate to your local development URL (typically http://localhost:3000)
- Locate the Vercel Toolbar Widget
Look for the widget in the bottom-right corner of your browser:
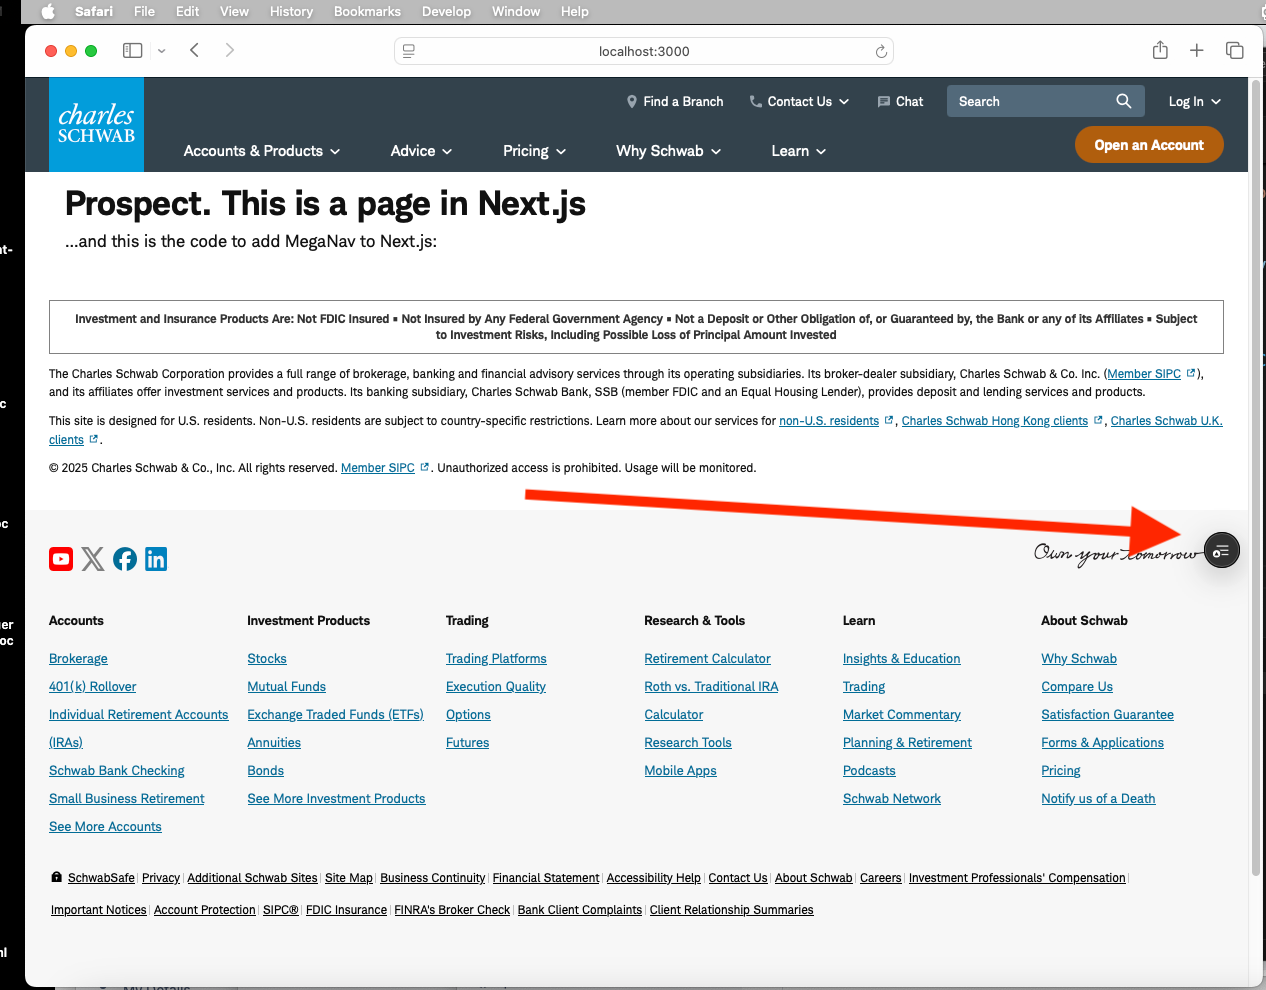
- Select Feature Flags
Click the widget to open the toolbar interface:
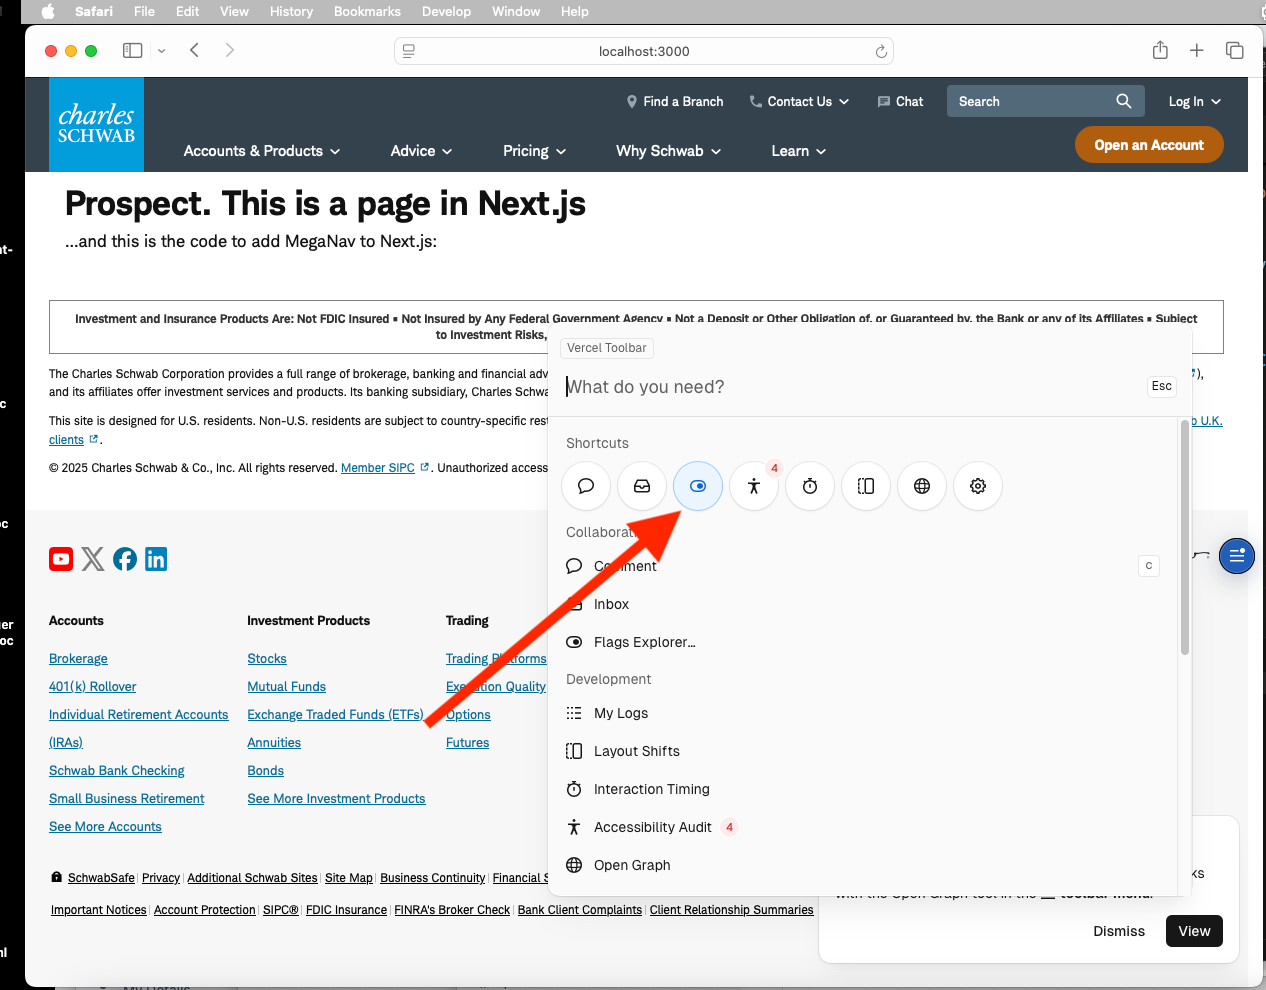
- Toggle Flags
Use the slider to change flag values from false to true (or vice versa):
-6851f74b77038fe9a20caf9b60011974.png)
- Apply Changes
Click the "Apply" button (lower right corner) to activate your changes.
If the Vercel Toolbar widget disappears after clicking Apply:
- Refresh your browser window
- Scroll the page slightly
- The widget should reappear
How It Works
After clicking Apply, the feature flag changes take effect within seconds. The page will reload with the new flag configuration automatically.
Method 3: Vercel Chrome Extension (Cross-App Support)
For a more robust solution that works across all apps and environments, install the Vercel browser extension.
Installation
Google Chrome:
Microsoft Edge:
- Use the same Chrome extension (installation guide)
Advantages
- Works in all apps (not just
www.schwab.com) - Available across different environments
- Same interface as the Vercel Toolbar component
- Persists across browser sessions
Once installed, the extension provides the same toolbar widget interface shown in Method 2.
Method 4: LaunchDarkly (Integration Testing)
Use LaunchDarkly to test flags in preview deployments and production-like environments.
This method requires:
- Code committed and pushed to repository
- Vercel preview deployment created
- LaunchDarkly access (see permissions guide)
Step 1: Commit Your Changes
schwab commit
Interactive prompts:
- Replace previous commit? → Your choice (yes to amend, no to create new)
- Type of change? → Usually "patch"
- Commit message? → e.g., "testing feature flag"
- URL to demonstrate? → Not needed for testing, can skip
Step 2: Push to Remote
schwab push
Interactive prompts:
- Create pull request? → No
- Ready for review? → No
Wait for build: Watch the terminal output. Look for "NextJS Build Succeeded" message.
After pushing, wait 5-10 minutes for:
- Vercel to create preview deployment
- Feature flag to sync with LaunchDarkly
Step 3: Find Preview Deployment
Visit the Vercel deployments page: https://vercel.com/charles-schwab/www.schwab.com/deployments?environment=preview
Your deployment should be at the top of the list. Search by:
- Feature flag name
- Ticket number
- Commit message
Step 4: Toggle in LaunchDarkly
-
Login to LaunchDarkly
Navigate to: https://app.launchdarkly.com
Access RequiredIf you cannot login or switch flags, request permissions via the LaunchDarkly Process Flow documentation.
-
Find Your Flag
The landing page shows a list of all feature flags. Locate yours by name.
-
Select Environment
Choose "Preview" environment from the dropdown.
-
Toggle Flag State
Use the toggle switch to turn the flag on/off.
-
Test Preview Deployment
Visit your preview deployment URL and verify the flag behavior.
LaunchDarkly Interface
The LaunchDarkly dashboard allows you to:
- Toggle flags for specific environments
- Target specific users or user segments
- Set percentage rollouts
- View flag evaluation metrics
- Configure flag rules and variations
Comparison of Methods
| Method | Speed | Environments | Apps | Setup Required |
|---|---|---|---|---|
| Manual Override | Instant | Local only | All | None |
| Vercel Toolbar | Instant | Local dev | Limited | Auto (if enabled) |
| Chrome Extension | Instant | Local dev | All | Extension install |
| LaunchDarkly | 5-10 min sync | All (Preview, Prod) | All | Commit + Push |
Recommended Workflow
- Initial Development: Use Manual Override for quick iteration
- Component Testing: Use Vercel Toolbar/Extension for visual testing
- Integration Testing: Use LaunchDarkly for preview environment testing
- Production Rollout: Use LaunchDarkly for gradual rollout and monitoring
Testing With Feature Flags
Local Development Testing
Method 1: Manual Flag Override (Fastest)
Temporarily change the default value in your flag file:
export const fixSomethingPub = declareFlag({
  key: 'fixSomethingPub',
  defaultValue: true,  // Changed for testing
  description: 'Fix: EDU SomethingToFix PUB',
});
ALWAYS change back to defaultValue: false before committing!
Method 2: Vercel Toolbar (Recommended)
For apps with Vercel Toolbar enabled (e.g., www.schwab.com):
- Start development server:
cd /home/nextjs-web/apps/www.schwab.com
pnpm dev
- Open your app in browser (e.g.,
http://localhost:3000) - Click Vercel Toolbar widget (bottom-right)
- Toggle feature flags on/off
- Click "Apply" to see changes
If toolbar disappears after clicking Apply, refresh the page and scroll slightly.
Method 3: Vercel Chrome Extension
Install for broader coverage across all apps:
- Chrome: Vercel Extension
- Edge: Same extension works (see installation guide)
Unit Testing with Mocks
Use the Mockery class from @schwab/test:
import { Mockery } from '@schwab/test';

describe('MyComponent with feature flags', () => {
  beforeEach(() => {
    // Mock static flags
    Mockery.mockEvaluateStaticFlag({
      fixSomethingPub: true,
      releaseNewFeature: false,
    });
  });

  it('renders new feature when flag is enabled', async () => {
    const component = await MyComponent({ params: mockParams });
    expect(component).toContain('New Feature');
  });
});
import { Mockery } from '@schwab/test';

describe('API Route with dynamic flags', () => {
  beforeEach(() => {
    // Mock dynamic flags
    Mockery.mockEvaluateDynamicFlagImplementation('on');
  });

  it('uses optimized endpoint when flag is on', async () => {
    const response = await GET(mockRequest);
    expect(response.url).toContain('api-new');
  });
});
Integration Testing with LaunchDarkly
Prerequisites
- Code committed and pushed
- Preview deployment created
- LaunchDarkly access
Steps
1. Commit and Push
schwab commit
# Follow prompts - type: patch, message: "testing flag"

schwab push
# No to PR, No to ready for review
# Wait for "NextJS Build Succeeded"
2. Wait for Deployment
- Integration engine triggers Vercel preview deployment
- Flag syncs to LaunchDarkly (usually 2-5 minutes)
3. Find Preview Deployment
Visit: https://vercel.com/charles-schwab/www.schwab.com/deployments?environment=preview
Search for your metadata (flag name, ticket number)
4. Toggle in LaunchDarkly
- Login: https://app.launchdarkly.com
- Find your flag in the list
- Select "Preview" environment
- Toggle on/off
- Test your preview deployment
Environment Variables
Local Configuration
Edit .env.local in your app directory:
NEXT_PUBLIC_API_URL=https://api.schwab.com
LAUNCHDARKLY_SDK_KEY=sdk-key-here
Build-Time Variables
For variables needed at build time:
1. Add to turbo.json
{
  "globalEnv": [
    "NEXT_PUBLIC_API_URL",
    "LAUNCHDARKLY_SDK_KEY"
  ]
}
2. Add to Vercel Dashboard
- Go to Vercel Environment Variables
- Select correct app from top menu
- Add variable name and value
- Choose appropriate environments
3. Test Locally
vercel env pull --environment=development --cwd /home/nextjs-web/apps/www.schwab.com
Common Patterns and Best Practices
1. Feature Flag Lifecycle
2. Error Handling
Always provide fallbacks:
export default async function Page({ params }: { params: Promise<Params> }): Promise<JSX.Element> {
  const { code } = await params;

  try {
    const [flagNewFeature] = await Promise.all([
      evaluateStaticFlag(allFlags, code, 'releaseNewFeature'),
    ]);

    // Use flag with fallback
    const useNewFeature = flagNewFeature ?? false;

    return useNewFeature ? <NewFeature /> : <LegacyFeature />;
  } catch (error) {
    console.error('Flag evaluation failed:', error);
    // Always fallback to safe default
    return <LegacyFeature />;
  }
}
3. Performance Optimization
Evaluate all flags in parallel:
// ✅ Good: Parallel evaluation
const [flag1, flag2, flag3] = await Promise.all([
  evaluateStaticFlag(allFlags, code, 'flag1'),
  evaluateStaticFlag(allFlags, code, 'flag2'),
  evaluateStaticFlag(allFlags, code, 'flag3'),
]);

// ❌ Bad: Sequential evaluation (slow)
const flag1 = await evaluateStaticFlag(allFlags, code, 'flag1');
const flag2 = await evaluateStaticFlag(allFlags, code, 'flag2');
const flag3 = await evaluateStaticFlag(allFlags, code, 'flag3');
4. Type Safety
Use TypeScript generics for non-boolean flags:
// String flag
const mode = await evaluateStaticFlag<string>(
  allFlags,
  code,
  'featureCheckBotIdModes'
);

// Number flag
const limit = await evaluateStaticFlag<number>(
  allFlags,
  code,
  'featureResultsLimit'
);

// Boolean flag (default, no generic needed)
const enabled = await evaluateStaticFlag(
  allFlags,
  code,
  'releaseNewFeature'
);
Troubleshooting
Flag Not Showing in Vercel Toolbar
Symptoms: Flag doesn't appear in toolbar widget
Solutions:
- Verify flag file exists in
src/flags/flags/ - Check flag is exported in
src/flags/index.ts(should be automatic) - Restart dev server:
pnpm dev - Clear browser cache and reload
- Verify
<VercelToolbar>component is loaded (checklayout.tsx)
Flag Not Syncing to LaunchDarkly
Symptoms: Flag doesn't appear in LaunchDarkly dashboard
Solutions:
- Wait 5-10 minutes after push (sync is not instant)
- Verify build succeeded in Vercel dashboard
- Check environment variables are set correctly
- Confirm LaunchDarkly permissions (contact team lead)
Flag Value Not Changing
Symptoms: Toggling flag has no effect
Solutions:
- Click "Apply" button in Vercel Toolbar
- Refresh browser page
- Check flag is being evaluated (not hardcoded)
- Verify correct flag name (case-sensitive)
- Check for caching issues (disable browser cache)
TypeScript Errors
Symptoms: Type errors when using flags
Solutions:
- Import correct types:
import { TFeatureFlag } from '@schwab/schema/global/FeatureFlag'; - Use generics for non-boolean flags:
evaluateStaticFlag<string>(allFlags, code, 'flagName') - Provide fallback values:
const flag = await evaluateStaticFlag(allFlags, code, 'flagName') ?? false;
Build Failures
Symptoms: Build fails after adding flag
Solutions:
- Verify flag file syntax (check for typos)
- Ensure
defaultValueis set - Check imports are correct
- Run local build:
pnpm build - Check for circular dependencies
Quick Reference
Import Statements
// Static flags
import { evaluateStaticFlag } from '@schwab/utilities/flags';
import { allFlags } from '../../../flags';

// Dynamic flags
import { evaluateDynamicFlag } from '@schwab/utilities/flags';
import { allFlags } from '../../../../flags';

// Types
import { TFeatureFlag } from '@schwab/schema/global/FeatureFlag';

// Testing
import { Mockery } from '@schwab/test';
Common Commands
# Create/checkout with flags
schwab checkout CMS-12345

# Pull flags for existing branch
schwab pullflags CMS-12345

# Start dev server
pnpm dev

# Commit and push
schwab commit
schwab push

# Pull environment variables
vercel env pull --environment=development --cwd /home/nextjs-web/apps/www.schwab.com
File Locations
| Item | Location |
|---|---|
| Flag definitions | /apps/<app>/src/flags/flags/ |
| Flag index | /apps/<app>/src/flags/index.ts |
| Environment variables | /apps/<app>/.env.local |
| Utility functions | /packages/utilities/src/flags/index.ts |
| Type definitions | /packages/schema/src/global/FeatureFlag.ts |
| Test utilities | /packages/test/src/mock/base/Mockery.ts |
See Also
- Feature Flag System Architecture - Deep dive into architecture
- LaunchDarkly Process Flow - Permissions and workflows
- Test Package Documentation - Testing utilities
- Vercel Flags SDK - Official documentation